How to upload raw app UI screenshots
Raw app UI screenshots are the app interface images you upload into AppScreens. These are usually placed inside Device elements in your screenshot designs.
You can upload raw app UI screenshots in two ways:
upload them manually in App Screens
bulk upload a structured folder of screenshots
Method 1: Upload raw app UI screenshots manually
Use manual upload when you want to upload, replace or check screenshots one by one.
In the top toolbar, click App Screens.
This opens the screenshot uploader. Across the top, you’ll see each screenshot in your project. Within each screenshot, you’ll see upload areas for each device layer or target, such as iPhone, iPad, Android Phone or Android Tablet.
If your project uses multiple languages, use the language dropdown in the top-right corner to choose the language you want to upload screenshots for.
Upload a raw app UI screenshot for each device target.
You can upload in a few ways:
drag and drop a file from your file manager onto the matching target box
click a target box to browse your device and upload a file
click the image icon to choose a screenshot you have already uploaded to AppScreens
If you want to reuse the same screenshot for another device target, click the move icon and drag the screenshot to another target box.
Once your screenshots have been uploaded, click Save to close the uploader and refresh your project.
Your device targets are set during project setup. You can edit them at any time by clicking Setup in the top toolbar.
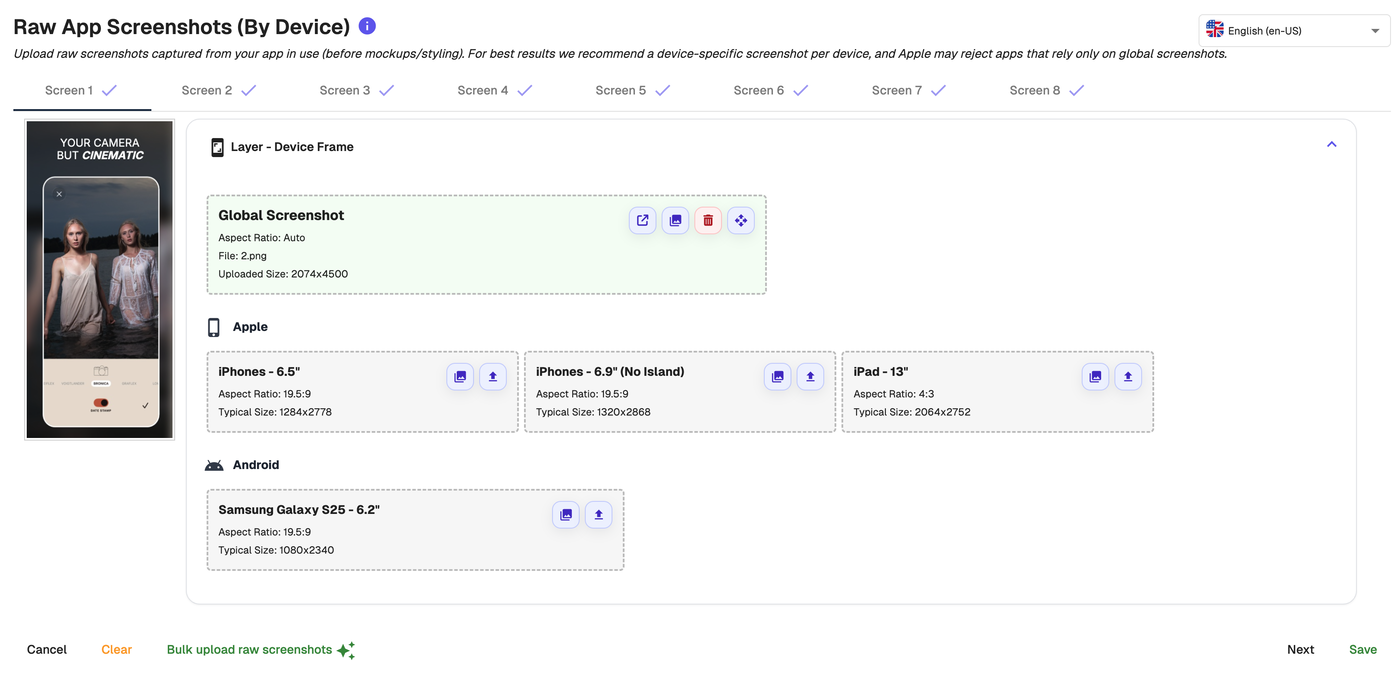
Should I use a Global Screenshot?
You can upload one Global Screenshot for your selected target devices, but this is usually not recommended for app store submissions.
Apple and Google expect screenshots to accurately represent the device they are submitted for. For example, iPad screenshots should show your app on an iPad-sized UI, not a reused or stretched phone screenshot. Apple may reject submissions if the screenshots do not show your app on the correct device type.
For best results, capture raw app UI screenshots from the correct device, simulator or emulator for each target size.
How do I view screenshots I have already uploaded?
To access raw app UI screenshots you have already uploaded to AppScreens, click the open icon shown as a box with an arrow.
You can then choose from screenshots stored in your AppScreens file manager instead of uploading the same file again.
Method 2: Bulk upload a folder of raw app UI screenshots
Use Bulk upload raw screenshots when you want to import many raw app UI screenshots at once.
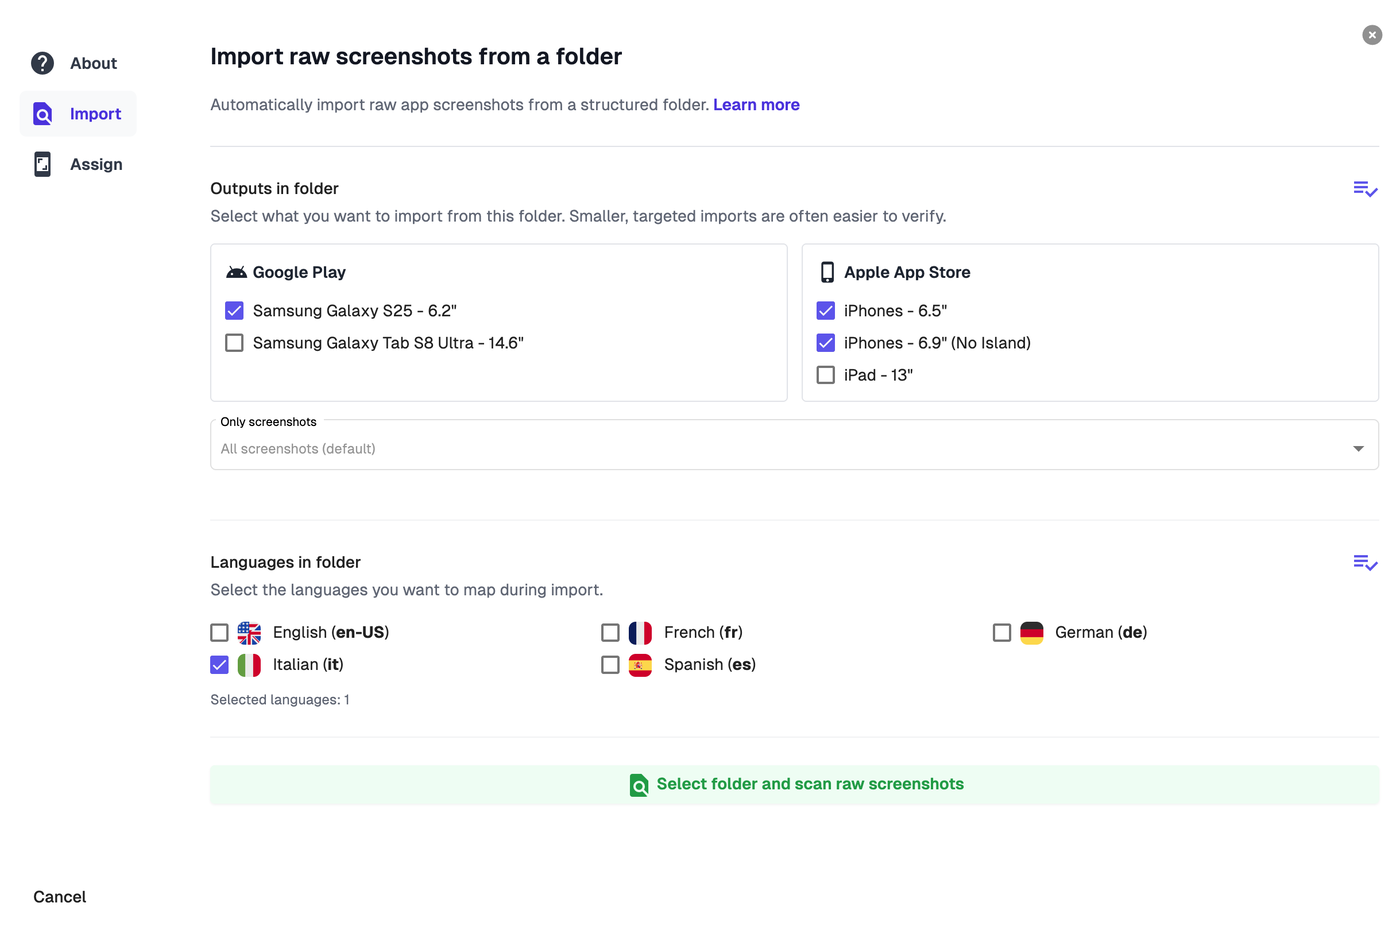
AppScreens can scan a structured folder and assign screenshots based on order, language and aspect ratio. Bulk upload also supports Fastlane exports, including capture_ios_screenshots and capture_android_screenshots.
For best accuracy, upload in smaller batches. Select only the outputs and languages included in the folder you are importing. Smaller imports are easier to verify and reduce the chance of screenshots being assigned to the wrong target.
To bulk upload:
In the top toolbar, click App Screens.
Click Bulk upload raw screenshots in the bottom-left corner.
Read the setup guidance and examples so your folder is structured correctly.
Select the outputs, screenshots and languages included in your folder.
Click Select folder and scan raw screenshots.
Choose the folder containing your raw app UI screenshots.
AppScreens scans the folder and assigns screenshots to the matching outputs, screenshots and languages.
Review the results carefully. Make sure each file has been assigned to the correct language, screenshot and device target.
If a screenshot has been assigned incorrectly, use the dropdown to change it manually.
If the results are not what you expected, click Abort & import again, check your folder structure, and upload again.
Once everything is assigned correctly, click Import assigned screenshots.
Tips for bulk upload
Bulk upload works best when your files are named and organised consistently.
File order
Files are sorted using natural sort, so AppScreens can order them as logically as possible.
For best results, use consistent file names with leading zeros, such as:
01020310
This works better than naming files 1, 2, 3, 10.
If one raw app UI screenshot is split across multiple device layers, AppScreens imports the split parts from bottom to top.
Split screenshot example
If a single raw app UI screenshot is split across multiple devices or layers, AppScreens imports the split parts from bottom to top.
This means your file order should match the layer order in AppScreens.
For example, say your project is set up like this:
Screen 1 uses one normal screenshot
Screen 2 and Screen 3 together show one split screenshot
Screen 2 and Screen 3 also each have their own non-split screenshot behind the split layer
Check the device/layer order in AppScreens from bottom to top, then number your files in the same sequence:
Screen 1: normal screenshot =
01Screen 2: bottom layer, behind the split layer =
02Screen 2: top layer, split part 1 =
03Screen 3: bottom layer, behind the split layer =
04Screen 3: top layer, split part 2 =
05
This helps AppScreens assign the files to the correct screenshot, device layer and split position during bulk upload.
Languages
To help AppScreens detect languages, include the language code shown in your project.
The language code should be separated from other text by non-alphanumeric characters.
Examples:
/iphone-en-en__fr_android-de-01
Aspect ratios
AppScreens checks file dimensions and aspect ratios to match screenshots to the correct targets.
Your folder should contain the correct number of screenshots for the output devices selected in your project.
If aspect ratios could match both iOS and Android targets, import them separately or order your files so Android comes first, then Apple, then any extras.
Leaving some files unassigned is okay. You can leave them unassigned or assign them manually after the scan.
Updating raw app UI screenshots later
You can reopen App Screens at any time to upload new raw app UI screenshots or replace existing ones.
Does AppScreens edit my raw app screenshots?
No. AppScreens does not edit the contents of your raw app screenshots.
Your raw app screenshots are the app UI images you upload into AppScreens. You can upload, replace, reorder and manage them in the App Screens section.
In the designer, you customise the elements around those raw app screenshots. For example, you can add text, device frames, backgrounds, images, shapes, badges, doodles and other design elements.
When you export, AppScreens creates final screenshot assets using your raw app screenshots inside the designs you created.
Good to know
Raw app UI screenshots may appear at a lower resolution inside the designer. This helps AppScreens load faster while you work.
When you download or export your finished screenshots, they export in crisp high resolution.