

How to localise your screenshot captions
Setup your languages
Input your manual expert language translations or have automated translations (powered by AI or Google) for your screenshots in over 80 languages.
Using an AI agent? Ask it to translate your captions or apply translations you already have. Your agent can run the project's automatic translation, set translations you've reviewed, or import and export a translation file, then preview each language so you can check the text fits.
Go into your project
Click on project setup
Click on the Languages section
You'll need to set your Default language, this is the base language for all of your translations
Select your preferred Translator - AI Translator, Google Translate or Manual Translations
If using AI Translator, enter your AI context: what your app does, its audience and preferred tone, and any brand names or terms to keep as they are. For example: “CookBook - Brand name. Keep exactly as “CookBook”. Never translate. Avoid hyphens. This is a recipe management app.”
Add all Export languages you'd like to localise your project to. Click on the List icon to quickly select/deselect all Apple and/or Google supported languages.
For the full list of supported languages, see Setup your Languages.
Warning: Automatic translations will be translated using AI or Google Translate and may not be accurate, we recommend engaging qualified translators to ensure translations are as accurate as possible.
Localise your captions
Open your project
Ensure you have setup your languages as above
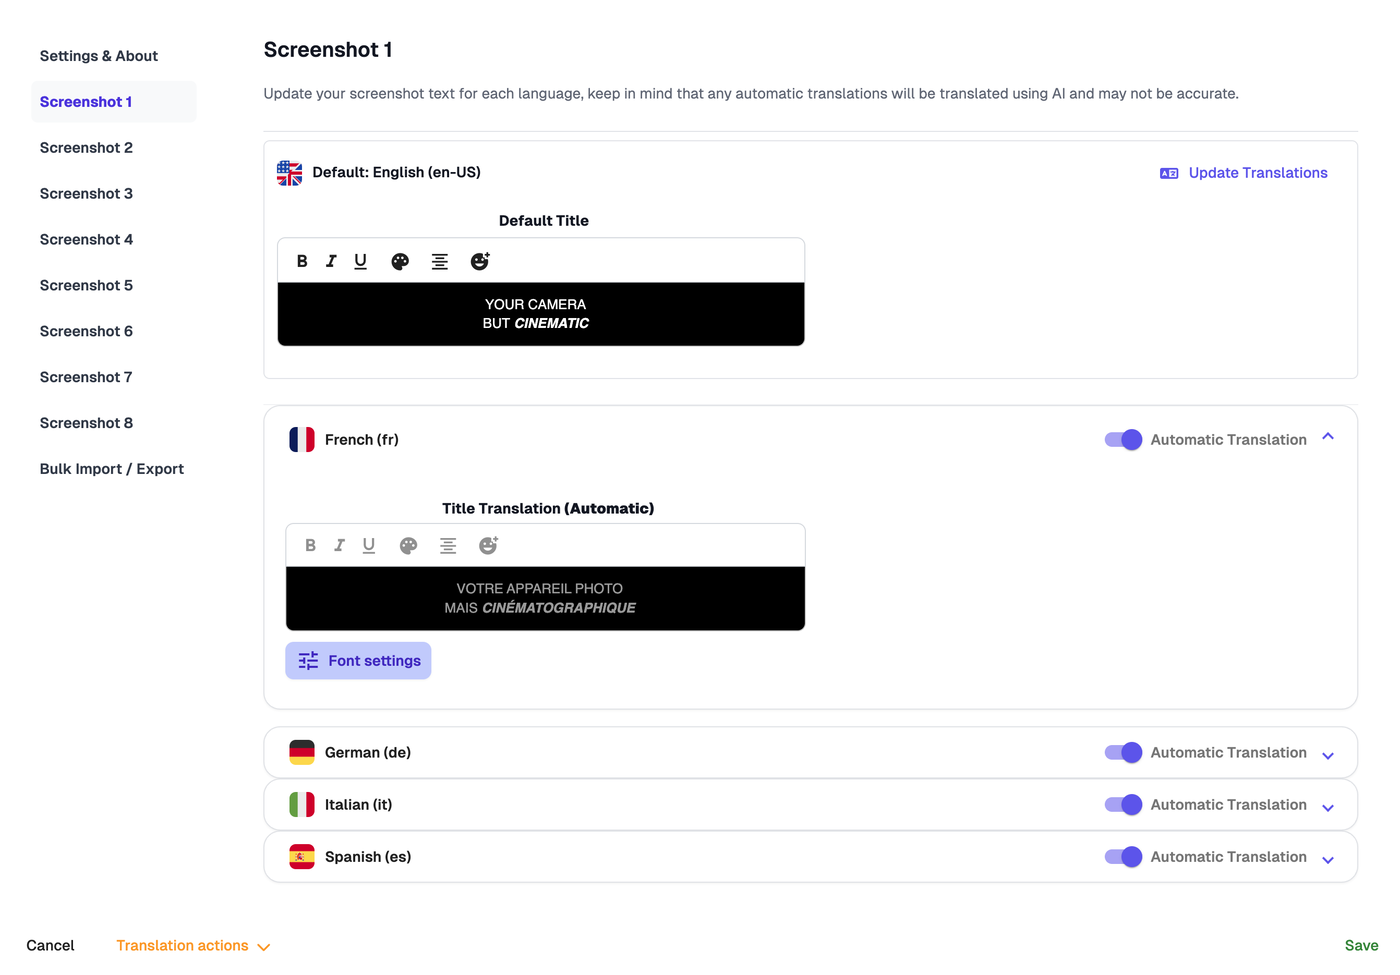
In the top toolbar, click the Localize button
For each screenshot, you can choose to have automatic translation or manually add the translations yourself. To turn on/off automatic translation, click on the Automatic Translation purple toggle. To switch it on or off for everything, click Translation actions in the bottom left corner, then Automatic translations > Enable all or Disable all.
When automatic translation is enabled and you update any text in your default language, hit Update Translations at the top right of the Default box to update all other languages.
When automatic translation is turned on you will not be able to edit the caption as it will be locked.
To edit a manual translation, ensure the automatic translation is switched off then type in the text boxes to update your caption.
To import / export all translations, click on Translation actions in the bottom left corner and select Import / Export or Click on Bulk Import / Export on the side list. Export your current translations to CSV, update them in a spreadsheet, then import the file back into this project.
Export - Choose the languages you want to send out. We export one row per screenshot text item for each selected language. Click Export CSV
Update CSV - Keep the headers the same and update only the translation rows you want to replace in AppScreens. If you move text boxes around after export, update the screenshot or text box numbers in the CSV before importing. Supported rich text in TranslationText:
<b>,<i>,<u>, text color spans, text background color spans, and<br>. Other HTML formatting will not be preserved.Upload - Upload the CSV to review matches first. We only replace translations that are present in the file. Click Review Import File and upload the CSV file.
Check the Import Review summary (ready to apply, skipped, duplicates and base text mismatches), then click Apply Import.
Click Save
Copy translations between languages
Copy translations, images or device screenshots from one language to another. For example, copy English (US) to English British and change only the words that differ, or copy your Spanish device screenshots to Spanish Mexico.
In Localize, click Translation actions > Copy localization data, or click Copy Localization on the side list.
Choose the language to Copy from and the language to Copy to.
Tick what to copy: Copy text translations, Copy image assignments and/or Copy device screenshots.
Leave Replace existing destination data off to only fill in what's empty, or tick it to overwrite what's already in the destination language.
Click Copy Localization Data, then Save.
Preview your project in all languages
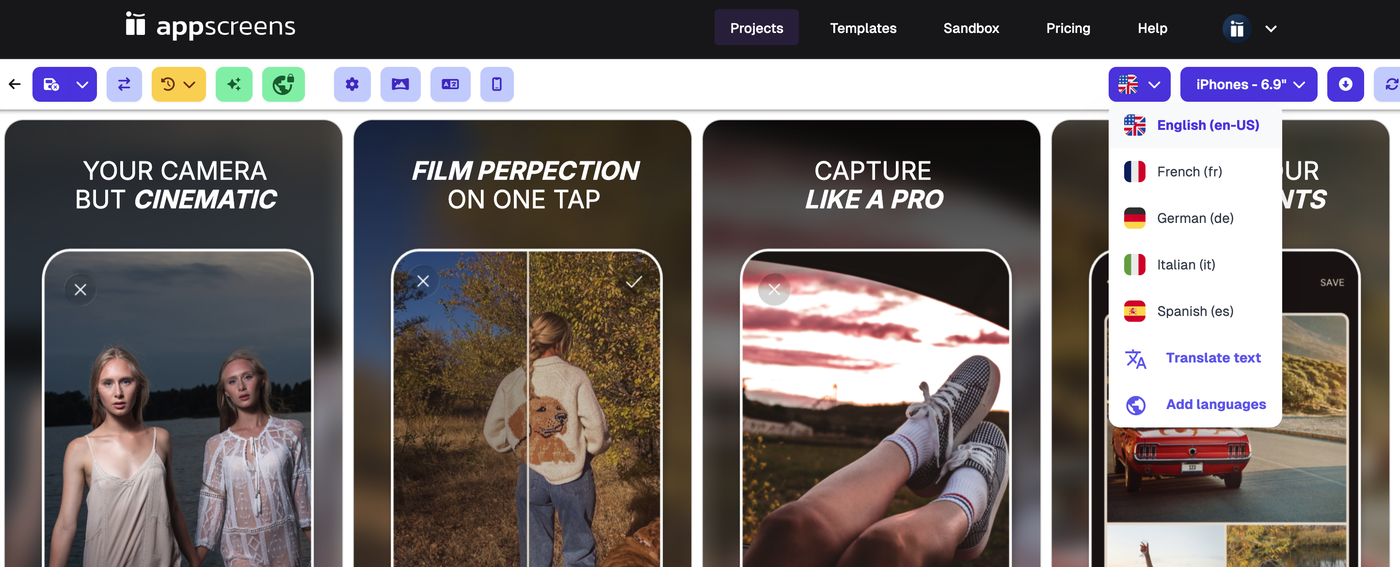
To view your project in each language, from the top toolbar, click on the language dropdown and select a language to preview.
Note: any changes you make in the designer when viewing other languages, will pull across to the design in all other languages in your project. The exception to this is when overriding the Title settings. An override is highlighted with an orange border around the setting.
For how to add localised screenshots for each language click here.