How to upload raw app screenshots
Single Screenshot Upload
In the top toolbar, click on the App Screens button.
This will open the screenshot uploader. Across the top bar, you will see each screen, and within each screen there will be a section for each device layer.
If you are localising your screenshots into other languages, you’ll see a language dropdown in the top right of the screenshot uploader.
Upload a raw screenshot of your app for each device. You can upload one Global Screenshot for your selected target devices but it is not recommended (see warning below).
Note: These targets are set during the initial project setup and can be edited at any time by clicking Setup in the top toolbar.Drag and drop your raw app screenshots from your file manage onto their associated target box, or click on the box to navigate to the screenshot via your file manager and upload. If you have already uploaded your raw app screenshot, click on the image icon and select your screenshot from your AppScreens file manager.
You can also drag and drop between devices to upload the same screenshot for another device. To do this, click on the move icon and drag & drop to another device.Once your screenshots have been uploaded, click Save to close the uploader and refresh your screenshots.
WARNING: To comply with App Store guidelines, your screenshots must accurately represent the devices they are intended for. Apple may reject submissions if the screenshots do not show your app on the correct device type.
To avoid rejections, we recommend capturing screenshots directly from the specific devices, simulators, or emulators that match the target screen sizes. For example, iPad screenshots should be taken on an iPad or in an iPad simulator. This helps ensure your app is accurately represented across all devices.
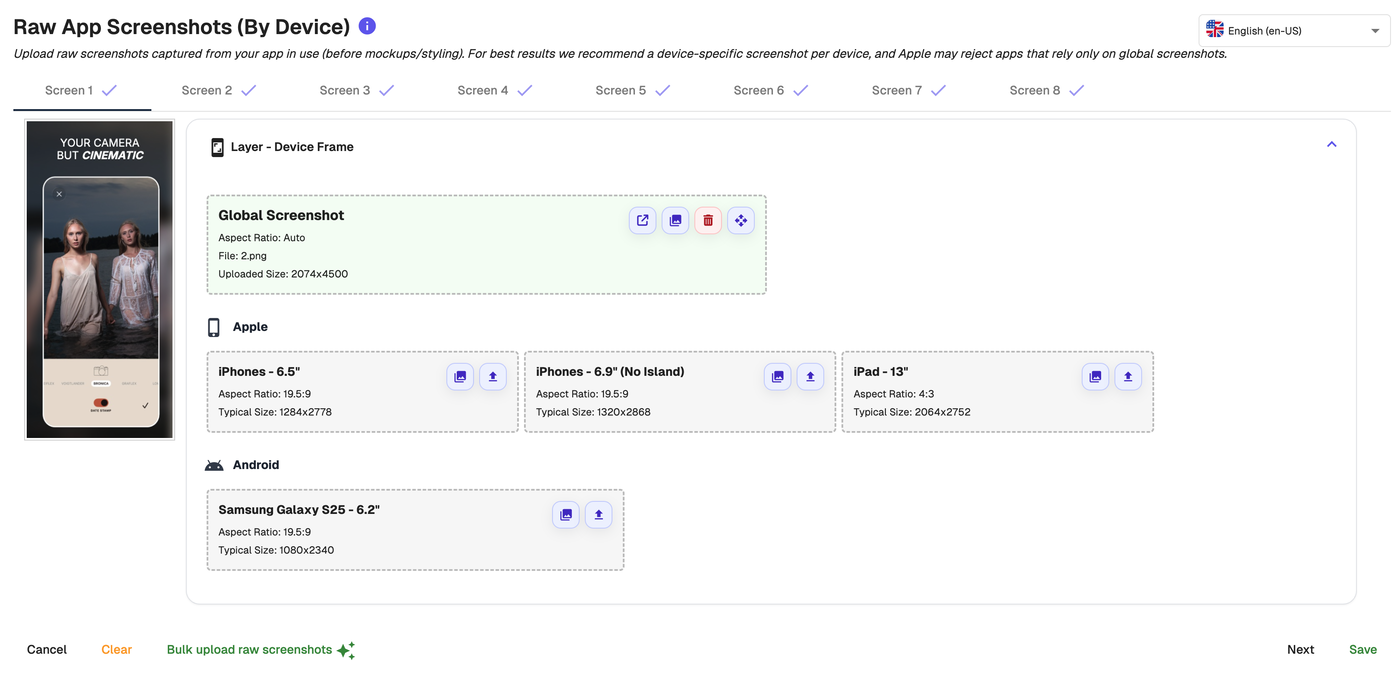
To access the raw app screenshots you have uploaded to AppScreens, click on the open (box & arrow) icon.
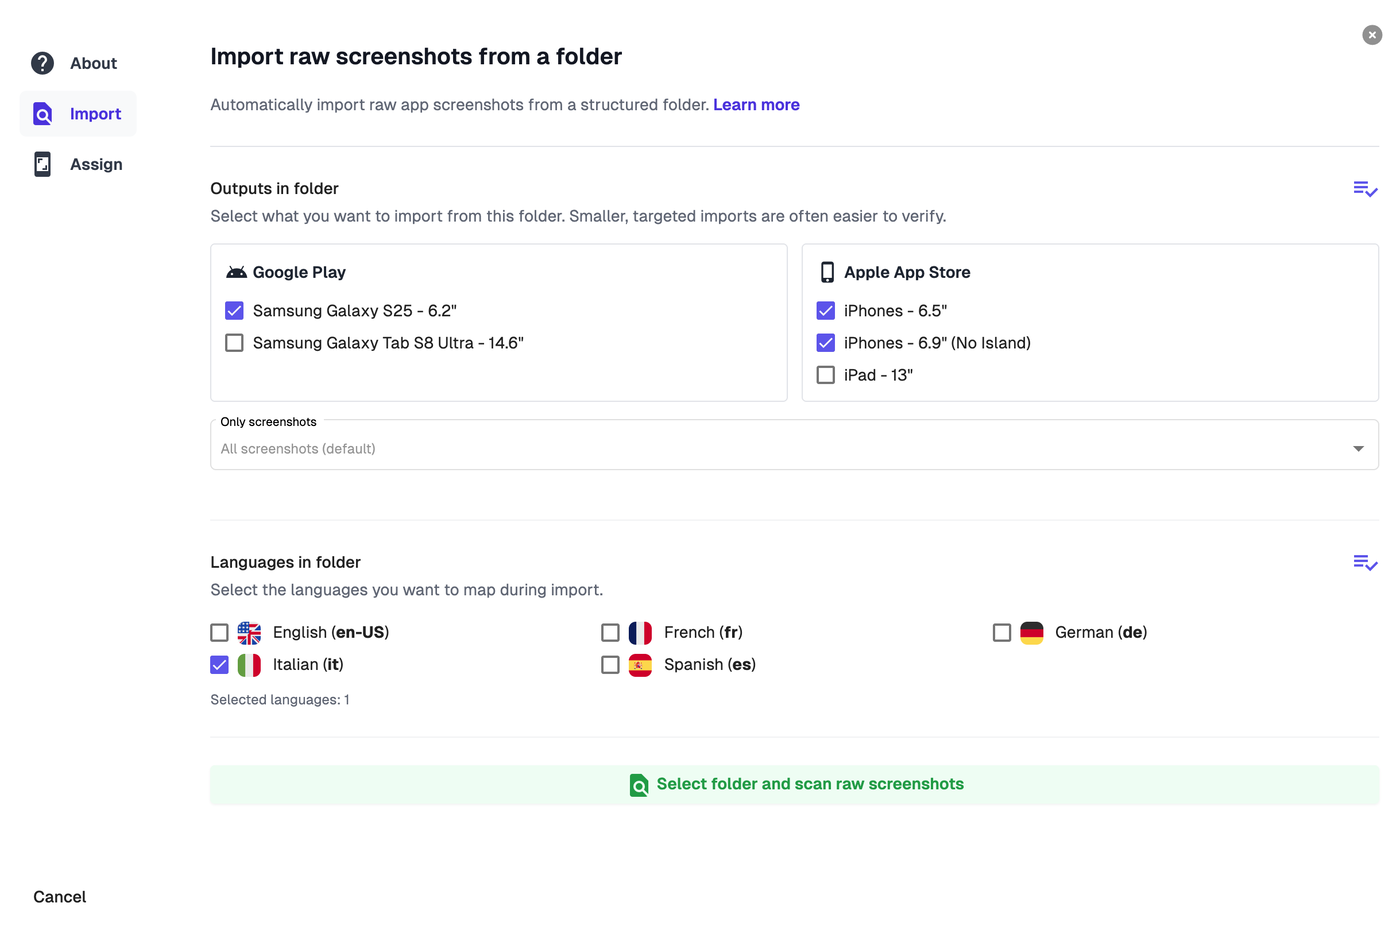
Bulk Folder Screenshot Upload
You can import all raw app screenshots from a structured folder, where we can detect the natural order, language and aspect ratio in accordance with your required screenshots. We also support exports from Fastlane (capture_ios_screenshots & capture_android_screenshots).
Import in smaller batches for best accuracy: Select only the outputs and languages you are importing in this pass. We now match exact sizes first, then fall back to aspect matching, so broad selections can still create ambiguity when multiple targets are valid. If sizes/languages are ambiguous, or if you want to reuse the same files across multiple device groups, run import multiple times with tighter selections. Leaving some files unassigned is normal; you leave them unassigned, or assign them manually afterward.
Raw Screenshot Order: Files are sorted using a "natural sort" to order them as logically as possible. For best results, please ensure these have uniform file conventions (i.e. prefix 0 for 01 through to 10). If you have multiple devices in a single screenshot, these are imported from bottom to top.
Language: Denote languages using the code displayed in your project. This must be prefixed & suffixed by a non-alphanumeric value (i.e. '/iphone-en-', 'en_', etc.).
Aspect Ratio: File dimensions and aspect ratios are automatically calculated. This tool expects the correct amount of screenshots for your project, these must be in accordance with the output devices selected in your project. If the Aspect Ratio's will clash between iOS and Android, either import separately or order files so that Android is first, then Apple, then any extras.
In the top toolbar, click the App Screens button.
This will open the screenshot uploader. Across the top bar, you will see each screenshot, and within each screenshot there will be a section for each layer.
Click Bulk upload raw screenshots in the bottom left corner.
Read through the setup guidance and examples so your folder is structured correctly.
Select the outputs, screenshots and languages in your folder. Smaller, targeted imports are often easier to verify.
Click Select folder and scan raw screenshots to choose the folder containing your screenshots.
AppScreens will sort and assign screenshots to the corresponding output sizes.
Review the results carefully and make sure files have been assigned to the correct languages, screenshots, and devices before continuing. You can use the drop down to select and change any images that have been incorrectly assigned.
If the results are not what you expected, click Abort & import again and check that your folder structure is correct before re-uploading.
Once all screenshots have been assigned correctly, click Import assigned screenshots.
Updating Screenshots
You can reopen the screenshot uploader at any time and upload more screenshots or replace existing ones. You do not need to upload your entire set again.
For example, if one raw app screen changes after an update, you can upload just that screenshot for the relevant languages or devices while keeping everything else unchanged.
NOTE: Within the designer, your screenshots may appear at a lower resolution. This helps reduce load time and lets updates appear more quickly while you work. When you download your screenshots, they will export in crisp high resolution.