How do I add and edit elements?
Each screenshot in AppScreens is made from editable elements, such as text, devices, images, shapes and spacing.
To start editing, click the screenshot you want to change. This opens the edit panel for that screen.
You can then click an element directly on the screenshot to edit it, or open Layouts & Elements to view and manage all elements on the selected screen.
Edit an existing element
The quickest way to edit an element is to click it directly on the screenshot.
When you click an element, AppScreens opens the matching section in the edit panel.
Within each element there are varying different selections and settings.
Deep dive into each element:
Image (mage, SVG, badge, doodle or uploaded asset)
Shape
Use Layouts & Elements to manage elements
You can also manage elements from Layouts & Elements in the edit panel.
Use Layouts & Elements when you want to:
see all elements on the selected screen
select an element that is hard to click on the canvas
add a new element
paste a copied element
copy, duplicate or delete an element
open Exact Dimensions
enter drag-and-drop mode
pick a preset
save the current screen layout as a preset
This is especially useful when elements overlap, sit behind other elements, or are partly off the edge of the screenshot.
Add a new element
To add a new element:
Click the screenshot you want to edit.
Open Layouts & Elements in the edit panel.
Click Add element.
You can also click the + icon beside the Layouts & Elements heading.
Choose the type of element you want to add.
Edit the new element’s settings.
You can add elements such as text, devices, images, shapes and spacing.
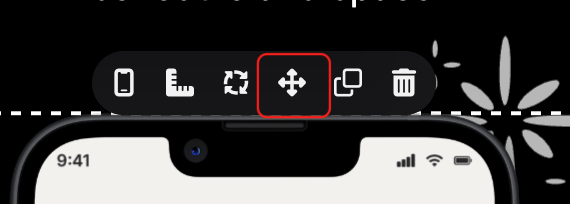
Move or resize an element
Most users should move and resize elements directly on the canvas with drag-and-drop.
To move or resize an element:
Click the screen you want to edit.
Click on the element.
Enter drag-and-drop mode by clicking on the move icon, or from Layouts & Elements.

Drag the element into position or resize it on the canvas.
Use the alignment guides to line it up with other elements.
Click Save positions when you are finished.
This is the easiest way to visually adjust your design.
Use Exact Dimensions for precise control
Use Exact Dimensions when you need more precise control than dragging on the canvas.
You can open Exact Dimensions in two ways:
click the right-angle ruler icon beside an individual element
click Exact Dimensions inside Layouts & Elements
For an individual element, Exact Dimensions lets you adjust values such as:
X position
Y position
width
height
spacing above or below the element
You can use Percent or Absolute values for an individual element.
The full Exact Dimensions view is percentage-based and is useful when you want to adjust the screen’s layout structure, layers, padding and element placement more precisely.

Copy, duplicate or delete an element
You can copy, duplicate or delete elements from the element controls or from Layouts & Elements.
Use these options when you want to:
reuse the same element on another screen
duplicate an element on the same screen
remove an element from the design
To copy an element to another screen:
Select the element.
Choose Copy element, or use the copy icon in Layouts & Elements.
Click the screen where you want to paste it.
Click Paste copied element in Layouts & Elements.
What type of element should I add?
Use this as a quick guide:
Element type | Use it for |
|---|---|
Device | Showing your app UI inside a phone or tablet frame. |
Title & Subtitle | Adding screenshot captions, headings and supporting text. |
Image | Adding uploaded images, logos, SVGs, badges, icons, backgrounds, Scribbles & Doodles. |
Shape | Adding editable rectangles, circles, triangles, lines and other simple shapes. |
Spacing / padding | Adjusting structured space between elements. |
Scribbles & Doodles are added as Image elements. Shapes are separate editable Shape elements.